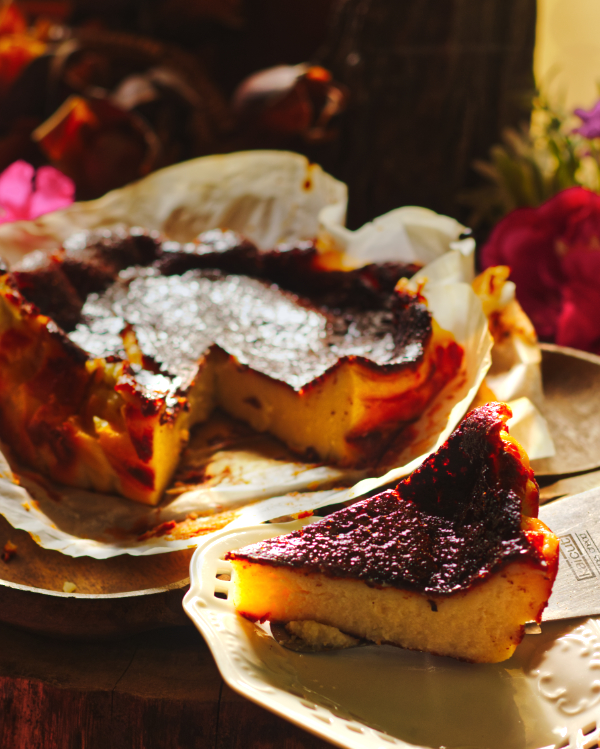
Cheesecakes are indulgent desserts. Just the thought of having cheesecake for dessert can light up every face… you will often find that it is a favourite with both the young and the old. In this post, I am sharing a new kind of this deliciousness that our family is now in love with.


Indeed, cheesecakes can be a showstoppers with a base like this one Chocolate Cheesecake. Or the dessert can mimic a cheesecake, but be lighter like this mango mousse set with gelatin or agar.
On the other hand, if you desire a cheesecake that does not have gelatin, or one that does not have a base… is easy and no fail, I have just the thing for you!
This rustic, endearing, easy, fuss-free and a lot-of-fun-making kind is the Burnt Basque Cheesecake.
Why the burnt basque cheesecake is a keeper!

Baked cheesecakes are usually a tough act to pull off. They need to be perfect else they will curdle, break-apart, not have the right consistency and so on.
But this awesome dessert is a keeper. My friend Michelle introduced me to it and I just had to try it out. But I did not have enough cream cheese, and there came my innovation.
Like a true Jugaadu (makeshifter or resourceful!) Indian housewife, I blended some paneer into the mixture and it worked just as well. For those who do not have access to paneer, just replace it with cream cheese and reduce the cream to 1 1/4 cup.
The cheesecake is traditionally jiggly in the centre, but I prefer to have a well-set dessert. Hence I add some extra flour as well. Refer to the notes to check out what to do if you do not have cream cheese at all.
It still turned out amazing, and we savoured each spoonful.
The best part of this dessert is that it closely resembles the caramel custard, but is creamier and definitely richer.
It is quite OK if it is cracked. RELAX even though it has uneven edges! And yes… burnt! Because that is how it is meant to be!
The cheesecake literally comes together in minutes and then you pop it in a really HOT oven and bake it.
This will give you the gorrrrgeous brown caramelisation that gives this dessert it’s name! Burnt Basque Cheesecake! For more information about why Basque… visit this website!
The tough part is that you need to wait for it to cool. And chill it for at least 4 hours before eating it. Good luck with that!
Some Pointers
The cheesecake tends to rise up quite a bit in the oven while baking. However, it will collapse after it is baked. This is quite normal.
The oven temperature needs to be high, that is, 220°C or 400°F. This will give the beautiful caramelised look that we are going for. Do refer to notes regarding the time taken.
Also to read how to line the parchment paper properly in the tin. It is OK if it has wrinkles, in fact it is better if the paper has wrinkles along the sides when you push it in. It will give the characteristic texture and shape to the cheesecake.
The cheesecake should be removed from the tin only after it is chilled overnight or at least for 4 hours in the fridge.
Material required
You will need a simple 8 inch round tin for this recipe. Having one of the springfoam pans will help, but it’s not essential.
A blender in which you can throw in all the ingredients will make things easy. Else you can whisk it with a hand mixer. This is essential for the smooth texture of the cheesecake.
You will need a good quality parchment paper to hold the cheesecake mixture in, and to give you the nice rustic folds that you see in the cheesecake. It will also help in the caramelisation of the sides to give the golden brown sides.
Easy Cheesecake
Course: DessertCuisine: BasqueDifficulty: Easy4
servings30
minutes40
minutesBurnt basque cheesecake will become a family favourite because if it’s unique creamy texture. A crowd pleaser. And so easy to make. You cannot go wrong!
Ingredients
1 1/2 cups cream
100 g cream cheese
100 g paneer
2 eggs
3/4 cup sugar
2 tbsp flour
1/2 tsp vanilla essence
Directions
- Preheat oven to 220°C or 400°F.
- Soak crumbled paneer in 1/2 cup cream in the blender jar for 5-10 minutes.
- Blend till smooth. Add cream cheese. Blend. Add the rest of the ingredients and blend again.
- Take a 8 inch cake tin. Refer to the notes to see how the parchment paper needs to be placed. Now pour the mixture in the centre.
- Place in the centre of the oven. Let it bake for 30 minutes or till the top looks golden brown and caramelised.
- Let it cool. Now refrigerate overnight or at least for 4 hours. Remove the cheesecake along with the parchment paper.
- Place on a serving platter. Serve with whipped cream or enjoy slices on their own.
Notes
- For preparing the pan: Push a large square of parchment into it with the help of a smaller utensil or your palms. Remember there should be no gaps through which the mixture can leak though. Now take another piece of parchment and place it such that the corners come up in between the earlier paper. This will ensure that the mixture does not overflow.
- Ensure the oven temperature is hot before the cheesecake is placed in it. Keep an eye on the cheesecake. If the top becomes brown before 15 minutes, the oven temperature is too high.
- If you want to avoid cream cheese all together, add 100 g more of paneer with 1/2 cup more of cream. Enjoy!
- For those who do not have access to paneer, just replace it with cream cheese and reduce the cream to 1 1/4 c

